Contents
- 01Welcome & Quick Start
- 02Installation & System Requirements
- 03The Interface — a tour of the window
- 04Signal Flow — how a voice is built
- 05Oscillators — OSC A / B, SUB, NOISE
- 06The Wavetable Editor
- 07The Source Engine — Sample · Granular · Spectral
- 08Filter
- 09LFOs
- 10Envelopes
- 11The Modulation Matrix
- 12Modulation Recipes — ready-to-wire routings
- 13The Effects Rack — all twelve effects
- 14The Arpeggiator
- 15Chord Mode — diatonic chord generator
- 16Mixer
- 17Global Settings
- 18The Preset Browser
- 19Preset Management — saving, banks & sharing
- 20MIDI, Automation & MPE
- 21Sound Design Walkthroughs
- 22Troubleshooting & FAQ
- 23Keyboard & Mouse Reference
01Welcome & Quick Start
Tilichu is a versatile wavetable synthesizer built for modern sound design — two morphing wavetable oscillators, a sample / granular / spectral source engine, a 32-slot modulation matrix, and a full rack of twelve effects, all wrapped in a fast, deeply playable interface. This manual explains every panel and control, and closes with hands-on walkthroughs.
Make your first sound in sixty seconds
- Insert Tilichu on an instrument track and play a few notes — the Init Saw patch is a single bright sawtooth, the perfect starting point.
- Click the preset name in the toolbar to open the Preset Browser, and double-click any patch to load it.
- Turn Cutoff in the Filter panel to open and close the tone; grab Reso for emphasis.
- Drag one of the four Macro knobs — every factory patch maps its macros to its most musical moves.
- Hit Rand in the toolbar for an instant variation, or Init to return to a blank slate.
02Installation & System Requirements
Tilichu ships as a 64-bit plug-in and standalone application for macOS, with Windows support coming soon. Run the installer and choose the formats your host uses; on first launch you will be asked to activate with your license.
| Platform | Requirements | Formats |
|---|---|---|
| macOS 12+ | Apple Silicon or Intel · 4 GB RAM · 1.5 GB disk | VST3 · AU · Standalone |
| Windows 10+ Coming soon | 64-bit CPU (SSE4.2) · 4 GB RAM · 1.5 GB disk | VST3 · Standalone |
Activation
Tilichu uses simple online activation — no dongle required. Enter your license key once; you may activate up to three machines and work offline thereafter. Manage seats from your account page.
03The Interface
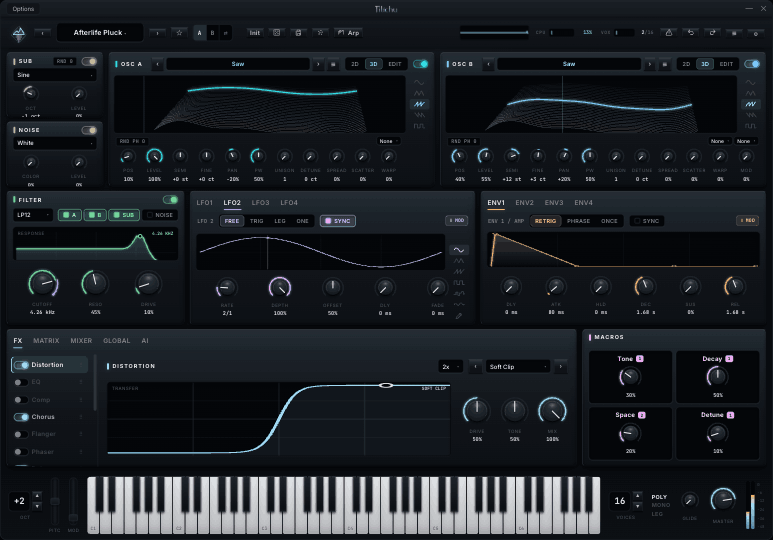
The window divides into five horizontal zones. From top to bottom: the title bar, the toolbar, the main synthesis area, the bottom tab rack, and the keyboard footer.
Title bar & toolbar
The title bar carries the Options menu, the Tilichu wordmark, and window controls. Directly below, the toolbar is your command center:
| Control | Function |
|---|---|
| ‹ Preset ▾ › | Previous / next patch, or click the name to open the Preset Browser. |
| ★ | Toggle the current patch as a favourite. |
| Init | Load a blank initialization patch. |
| Rand | Randomize parameters for an instant new sound. |
| Save | Store the current patch to the user bank. |
| Source | Open the Source engine over the oscillator band (§06). |
| Arp | Open the Arpeggiator view (§13). |
| Oscilloscope | A live master-output waveform, between Arp and the undo controls — a quick visual read on the sound leaving the plugin. |
| ↺ / ↻ | Undo / redo — every edit is undoable. |
| ☰ | App menu: import/export presets, presets folder, reset, update check, About. |
| ⚙ | Theme menu: surface, color mode, accent, knob style (see below). |
Theming (the ⚙ menu)
Tilichu's look is yours to tune. None of these settings affect the sound.
| Setting | Options |
|---|---|
| Surface | Flat or 3D — flat panels, or sculpted bevels and recessed wells. |
| Color Mode | Mono (one accent everywhere) or Multi (each section gets its own hue). |
| Accent | Ice · Platinum · Amber · Helix · Violet. |
| Knob Indicator | Arc (filled value arc), Ring (dot on rim), or Tick (pointer). |
The keyboard footer
A six-octave keybed with pitch and mod wheels on the left, and voice controls on the right: the octave stepper, voice count, voice mode (POLY / MONO / LEG), glide, and the master output knob with a stereo level meter.
04Signal Flow
Every voice in Tilichu follows the same path: sources are summed, filtered, shaped by the amp envelope, run through the effects rack, and sent to the output — while the modulation system reaches into every stage along the way.
SUB · NOISE · RING
route
+ drive
/ VCA
in series
+ meter
When the Source engine (Sample / Granular / Spectral) is open, it takes the place of the OSC A / OSC B band at the head of the chain.
How to read it
- Sources — the two wavetable oscillators, SUB, NOISE, and the RING modulator (OSC A × OSC B) generate the raw tone. The Source engine can replace the oscillator band.
- Mixer — sets each source's level and pan, and chooses whether it feeds the filter or bypasses straight to the output.
- Filter — the multimode filter (with drive) shapes any source routed into it; the routing chips decide which.
- Amp — ENV 1 is hard-wired to the amplifier, so it governs the note's overall loudness contour.
- FX Rack — up to twelve effects process the summed voice in series; drag to reorder.
- Modulation — LFOs, envelopes, macros, and performance inputs feed the 32-slot matrix, which can drive almost any parameter in the stages above.
05Oscillators
Tilichu's tone begins with two identical wavetable oscillators — OSC A and OSC B — flanked by a dedicated SUB oscillator and a NOISE generator.
OSC A & OSC B
Each oscillator scans a 256-frame wavetable. The Pos knob sweeps the frame position — the heart of wavetable synthesis — and the display shows the table as a live 2D slice, a 3D waterfall, or the full editor (see §05). Cycle wavetables with the ‹ › arrows, or click the name for the full library.
| Knob | Range | Description |
|---|---|---|
| Pos | 0–100% | Wavetable frame position — morphs the timbre. |
| Level | 0–100% | Oscillator output level. |
| Semi | ±24 st | Coarse pitch, in semitones (bipolar). |
| Fine | ±50 ct | Fine pitch, in cents (bipolar). |
| Pan | L–R | Stereo position (bipolar). |
| PW | 0–100% | Pulse / phase width of the read. |
| Unison | 1–16 | Stacked detuned voices. |
| Detune | 0–100% | Spread of the unison voices in pitch. |
| Spread | 0–100% | Stereo width of the unison stack. |
| Scatter | 0–100% | Randomizes the start phase of each unison voice. |
| Warp | 0–100% | Shape distortion; the mode is set by the combo above the knob. |
| Mod (OSC B) | 0–100% | Cross-modulation depth; the mode is set above the knob. |
Warp modes (the small combo above the Warp knob) reshape the wavetable read in real time:
OSC B adds a Mod knob whose mode selects how OSC A modulates OSC B:
SUB & NOISE
To the left of the oscillators sits a compact source rail. The SUB oscillator adds weight beneath the mix — choose a waveform (Sine / Triangle / Square / Saw), set its octave and level. The NOISE generator adds a type (White, Pink, or Brown), a Color tilt, and a level. Both have on/off toggles and feed the filter like any other source.
06The Wavetable Editor
Click EDIT on either oscillator's view selector to open the full-screen wavetable editor — draw, resynthesize, and morph your own tables.
The editor takes over the synthesis area and is organized into a tool sidebar, two work surfaces, and a frame timeline.
| Area | What it does |
|---|---|
| Draw tools | Pencil (freehand), Line (straight segments), Smooth (averages neighbors), and a Mirror toggle for symmetric drawing. |
| Insert shape | One click drops a Sine, Triangle, Saw, Rev-Saw, Pulse, or Noise waveform into the current frame. |
| Process | Normalize, Invert, Smooth, or Clear the current frame. |
| Waveform canvas | The large surface — drag to draw the single-cycle waveform directly. |
| Harmonic editor | 32 additive partials. Drag a bar to set its amplitude and the waveform is resynthesized from the harmonics. |
| Frame timeline | Thumbnails of every frame. New, Duplicate, Delete, or Morph to interpolate frames between two shapes. |
Load your own single-cycle or full wavetable audio with Import WAV, and Save the result into the library. Close the editor with the ✕ in its header.
Importing a WAV
Drop a WAV, AIFF, or FLAC onto the import dialog (or browse to it) and choose how Tilichu should slice the file into wavetable frames:
| Slice mode | What it does |
|---|---|
| Constant blocks | Cuts the file into fixed 2048-sample frames — the standard export format from Serum, Vital, and Surge. Use this for files already authored as wavetables. |
| Pitch single-cycle | Detects the fundamental and extracts one representative cycle. Best for turning a sampled note into a single-frame table. |
| Zero-crossing slice | Cuts at positive zero-crossings, grouping 1, 2, 4, or 8 cycles per frame. Good for raw or irregular material. |
The dialog previews the imported waveform and the resulting frame count before you commit. Press Import to load the frames into the timeline, where you can edit, reorder, or morph them like any other table.
07The Source Engine
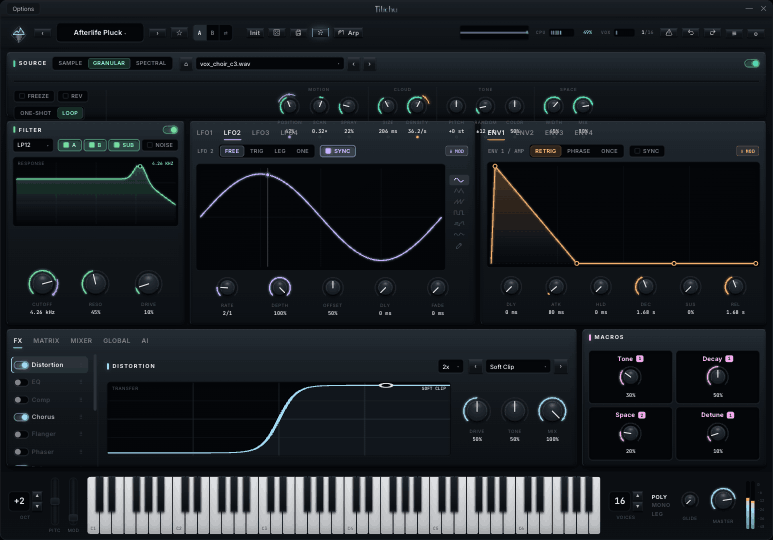
Press Source in the toolbar to swap the oscillator band for a full-width sample engine with three modes — Sample, Granular, and Spectral. The Filter, LFO, and Envelope panels stay in place below.
Sample
Classic sample playback. Drop in any audio file, choose a loop mode (One-Shot, Loop, or Ping-Pong), set the loop region, crossfade, and keytracking. Ideal for multisamples, drums, and one-shots.
Granular
Plays the sample as a cloud of overlapping grains. Scan through the file, spray the grain positions for texture, and shape density, size, pitch, and per-grain stereo width. Freeze locks the playhead to hold a texture indefinitely; Loop and Keytrack behave as in Sample mode.
Spectral
Analyzes the sample into a spectrum you can reshape and resynthesize in real time. Play it back in Harmonic or Inharmonic mode, redraw the harmonic balance with the flex curve, and apply a spectral warp — Gate, Smear, Spread, Oct Up, or Shift — for anything from subtle EQ-like moves to radical morphs.
08Filter
A single multimode filter shapes the combined output of every source. The response curve shows the shape live; the routing chips decide what feeds it.
| Control | Description |
|---|---|
| Type | LP12 · LP24 · HP12 · HP24 · BP · Notch · Ladder · Comb · Formant. |
| A / B / SUB / NOISE | Routing chips — enable each source into the filter. A disabled source bypasses the filter to the output. |
| Cutoff | Corner frequency (20 Hz – 20 kHz). |
| Reso | Resonant emphasis at the cutoff. |
| Drive | Pre-filter saturation for warmth and grit. |
09LFOs
Four independent low-frequency oscillators provide cyclic modulation. Select LFO 1–4 with the tabs; each has its own shape, rate, and behavior.
| Control | Description |
|---|---|
| Mode | Free (runs continuously), Trigger (restarts each note), Legato (restarts only on non-legato notes), One-Shot (runs once, like an envelope). |
| Shape | Sine, Triangle, Saw, Square, Sample & Hold, Smooth-random, or a hand-Drawn custom shape. |
| Rate | Speed, free-running in Hz or tempo-synced. |
| Depth | Overall output amount. |
| Offset | Shifts the output up or down (bipolar). |
| Dly / Fade | Delay before the LFO starts, and a fade-in time. |
Each LFO is a modulation source — click its ⠿ MOD pill and drag onto any knob to assign it, or wire it explicitly in the matrix (§10).
10Envelopes
Four DAHDSR envelopes shape how sound evolves over a note. ENV 1 is hard-wired to amplitude; ENV 2–4 are free modulation sources.
| Stage | Description |
|---|---|
| Dly | Delay before the envelope begins. |
| Atk | Attack — time to reach full level. |
| Hld | Hold at peak before decay. |
| Dec | Decay — fall to the sustain level. |
| Sus | Sustain — held level while the key is down. |
| Rel | Release — fade after the key is released. |
The Mode switch (Retrig / Phrase / Once) sets how the envelope retriggers — restart on every note, restart only at the start of a phrase (legato-aware), or run once like a one-shot.
11The Modulation Matrix
The Matrix tab is where modulation becomes explicit. Each of its 32 slots wires a source to a destination with a bipolar depth and a response curve.
| Column | Description |
|---|---|
| Source | Any LFO, envelope, macro, or performance input (velocity, mod wheel, aftertouch, keytrack…). |
| Destination | Almost any knob in Tilichu — pick from the list or right-click a knob to assign. |
| Depth | Bipolar amount bar; drag left for negative, right for positive. |
| Curve | LIN linear · EXP exponential · LOG logarithmic response. |
Patch cables — drag to route
You rarely need to open the Matrix tab to make a connection. Every modulation source — each LFO and envelope panel, and every macro — carries a ⠿ MOD handle. Press it and drag: a glowing patch cable follows your cursor across the whole instrument, drawn in that source's signature color. Release it over any knob and the routing is made — a new matrix slot is created automatically, and a small colored tap appears on the knob to show it is now a destination.
- The cable is tinted by the source's accent (violet for LFOs, amber for envelopes, magenta for macros), so a densely patched sound stays readable at a glance.
- As you drag, any knob under the cursor highlights with a dashed ring to confirm it is a valid target before you drop.
- Dropping creates the route at a sensible default depth; open the Matrix tab to fine-tune depth and curve, or right-click the source to list and remove its routings.
- A single source can be dragged to as many knobs as you like — each drop adds another slot.
Macros
The four Macro knobs (bottom-right) are performance controls — assign each to several destinations at once for expressive, one-knob morphs. Rename them and they follow the patch. Macros are the controls factory patches expose first, so they are the natural place to build a patch's "signature move."
12Modulation Recipes
A collection of ready-to-wire routings. Each recipe lists the matrix slots to set up — source → destination, a suggested depth and curve — plus what to listen for. Use the ⠿ MOD drag-to-assign shortcut, then fine-tune depth and curve in the Matrix tab.
1 · Filter pluck
A snappy, percussive attack that closes into the body of the note — the backbone of plucks, basses, and stabs.
| Source | → Destination | Depth | Curve |
|---|---|---|---|
| ENV 2 | Filter Cutoff | +50% | EXP |
Give ENV 2 a fast attack, short decay, and zero sustain. Positive depth opens the filter on each note, then the decay snaps it shut. Shorten the decay for tighter plucks; add a little Reso for a vocal quack.
2 · Wavetable drift
Slow, hands-free timbral movement — the classic "evolving" wavetable pad.
| Source | → Destination | Depth | Curve |
|---|---|---|---|
| LFO 2 (Smooth, slow) | OSC A Pos | +30% | LIN |
| LFO 3 (Smooth, slower) | OSC B Pos | +22% | LIN |
Set the two LFOs to the Smooth-random shape at different rates so the oscillators drift independently — the stereo field never quite repeats. Keep depths modest; a little wavetable movement goes a long way.
3 · Velocity dynamics
Make the patch respond to how hard you play — brighter and louder on harder hits.
| Source | → Destination | Depth | Curve |
|---|---|---|---|
| Velocity | Filter Cutoff | +35% | LIN |
| Velocity | ENV 2 Amount | +40% | EXP |
Routing velocity to both the cutoff and the mod-envelope depth means soft notes stay dark and gentle while hard notes open up and bite — the single most important routing for an expressive lead.
4 · Vibrato on the wheel
Player-controlled pitch vibrato that only appears when you want it.
| Source | → Destination | Depth | Curve |
|---|---|---|---|
| LFO 1 (Sine, ~5 Hz) | Global Pitch | +6% | LIN |
| Mod Wheel | LFO 1 Depth | +100% | LIN |
The mod wheel scales the vibrato LFO's own depth, so at rest there is no vibrato — push the wheel up and it fades in. Add a short LFO Dly for a delayed vibrato that arrives only on held notes.
5 · Macro morph
Turn one knob and reshape the whole patch — the "signature move" a good preset offers.
| Source | → Destination | Depth | Curve |
|---|---|---|---|
| Macro 1 | Filter Cutoff | +45% | LIN |
| Macro 1 | Reverb Mix | +60% | LIN |
| Macro 1 | OSC B Level | −30% | LIN |
Stacking one macro across several destinations — some positive, some negative — makes a single control sweep from "close and dry" to "open, wide, and washed out." Rename the macro (e.g. Open) so its intent is obvious.
6 · Rhythmic gate
A tempo-locked pumping or trance-gate movement.
| Source | → Destination | Depth | Curve |
|---|---|---|---|
| LFO 4 (Draw, synced 1/16) | Amp / VCA Level | +80% | LIN |
Draw a custom step pattern into LFO 4 and sync it to the host. Route it to amplitude for a trance gate, or to the filter cutoff instead for a softer rhythmic wobble. Tie the pattern length to your groove.
13The Effects Rack
The FX tab holds twelve effects in a reorderable rack. The list on the left shows every slot with its on/off toggle and drag handle; select a slot to edit it in the detail panel on the right, where a live visualization tracks every knob.
Distortion
Nine shaping curves — Soft Clip, Hard Clip, two Diode models, Tube, Fold, Foldback, Bitcrush, and Downsample — each shown as a transfer curve. Controls: Drive, Tone, Mix, plus an oversampling selector to keep it clean.
EQ
A quick tone shaper: low and high shelves plus a sweepable mid bell. Low, Mid, Freq, High.
Compressor
Dynamics with a transfer curve and gain-reduction meter. Thresh, Ratio, Attack, Release, Makeup.
Chorus
Four types (Classic, Ensemble, Dimension, String). Rate, Depth, Delay, Width, Mix.
Flanger
Sweeping comb filter with feedback. Rate, Depth, Fdbk, Delay, Mix.
Phaser
Six-stage all-pass phaser, optionally tempo-synced. Rate, Depth, Fdbk, Mix.
Delay
A digital or Tape delay with ping-pong and tempo sync. In sync mode pick a base note (1/1–1/32) and a modifier (straight, dotted, triplet). Time, Fdbk, Filter, Mix.
Reverb
Room, Plate, and Hall algorithms with a shimmer option. Primary knobs Size, Decay, Mix, Shimmer; secondary row Damp, Pre, LoCut, HiCut, Mod, Diff, Width.
Convolution
Convolution reverb using impulse responses — Small Room, Hall, Plate, Spring, Cathedral, Drum Room, and Ambience — with a reverse option. Mix, Pre, Length, Start, Stretch, LoCut, HiCut.
Multiband Compressor
Three-band dynamics with a crossover bar and per-band Threshold, Ratio, Attack, Release, and Makeup.
Widener
Stereo widening (M/S, Haas, or All-pass) with a goniometer scope and a Bass-Mono option to keep the low end centered. Width, Stereo, Damp, Mix.
Limiter
A brick-wall limiter for the output with auto-makeup and a gain-reduction meter. Thresh, Release.
14The Arpeggiator
Press Arp in the toolbar for a full step-sequencing arpeggiator. Play a chord and Tilichu turns it into a rhythmic pattern you can shape per-step.
| Control | Description |
|---|---|
| Mode | Up · Down · Up-Down · Down-Up · As Played · Random · Chord · Out · In. |
| Sync / MIDI | Lock to host tempo, and/or output the arp as MIDI to other instruments. |
| Octaves | Span the pattern across 1–4 octaves. |
| Rate | Step division, 1/1 down to 1/32 (incl. triplets). |
| Swing | Shuffle feel, up to 75%. |
| Gate | Global note length. |
| Velocity | Global velocity scaling. |
| Strum | Offsets chord notes in time for a strummed feel. |
Below the knobs, the step grid lets you edit each step individually — per-step note offset, velocity, gate length, probability, and ties. The pattern can be 1, 2, 4, 8, 16, 32, or 64 steps long (16 by default). Use the pattern tools to clear or randomize the sequence.
15Chord Mode
Chord Mode turns Tilichu into a scale-aware chord instrument: hold down single keys and the engine voices full diatonic chords, in key, with the extension you choose. It's built for quick progressions, live performance, and writing harmony without thinking about theory.
Enable it from the Global tab — set Chord to On — and pick a governing Scale. While Chord Mode is on, the keyboard splits into three zones (the lower two are tinted on the on-screen keybed so you can see them at a glance).
The three keyboard zones
| Zone | Range | What it does |
|---|---|---|
| Root select | below C1 (C0–B0) | Sets the key — the tonic the chords are built from. Tinted cyan. |
| Chord latch | C1 – B1 | Latches the extension of the chords you play. Tinted teal. |
| Play zone | C2 and up | Plays the progression. Each white key is a scale degree; play it in any octave. |
So a typical setup is: tap a note below C1 to choose the key, tap a key in the C1–B1 band to choose how lush the chords are, then play melodies from C2 upward — every key you press sounds a complete, in-key chord.
Extensions (the C1–B1 latch band)
| Latch key | Chord built |
|---|---|
| C1 | Triad — root, third, fifth. |
| D1 | 7th — adds the diatonic seventh. |
| E1 | 9th — adds the ninth. |
| F1 | 11th — adds the eleventh. |
| G1 | 13th — a full extended stack. |
Because the chords are diatonic, every degree stays in the chosen scale — the third is major or minor, the seventh major or dominant, and so on, exactly as the key dictates. You never play a wrong note.
Scales
The Scale selector governs which chords each degree produces. Eleven scales are available:
Major and Natural Minor cover most pop and cinematic writing; the modes (Dorian through Locrian) give modal colors; Harmonic and Melodic Minor add the classic raised-seventh tension; and the two pentatonics keep things open and consonant for leads and simpler harmony.
16Mixer
The Mixer tab gives every source its own channel strip — OSC A, OSC B, SUB, NOISE, RING (the ring modulator), and the effects return — plus a master strip.
Each strip has a level fader with a meter, a pan control, Mute / Solo buttons, and an output routing selector (Filter, Direct, or Master). The RING strip carries the ring-modulation of OSC A × OSC B — raise it for metallic, clangorous overtones. The master strip sums everything to the stereo output.
17Global Settings
The Global tab groups patch-wide behavior into four cards.
| Group | Settings |
|---|---|
| Voicing | Polyphony (4 / 8 / 16 / 32 / 64 voices, default 16), Voice Mode (Poly / Mono / Legato), and Voice Steal (Oldest / Newest / Lowest / Highest). |
| Pitch | Pitch-bend range (0–24 semitones). |
| Tuning | Coarse tune (semitones) and fine tune (cents). |
| Keyboard | Velocity sensitivity. |
| Quality | Engine quality tier — Eco (2× oversample, light osc tables), Normal (2× oversample, high-density tables — the default), or High (4× oversample) — plus a Render setting that can upgrade offline bounces to High (4×). |
| Output | Master level and output routing. |
The Scale selector and the Chord On/Off switch also live here — see Chord Mode (§14) for the full walkthrough.
18The Preset Browser
Click the preset name in the toolbar to open the browser — a fast, filterable library of every factory and user patch.
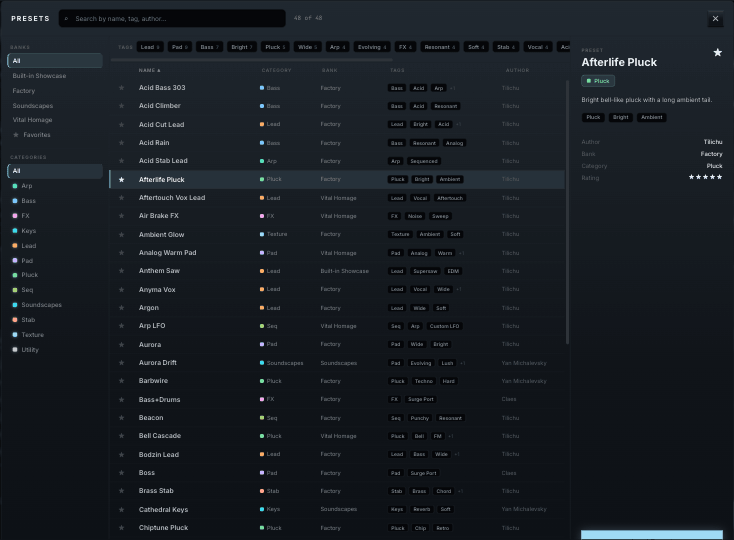
- Search by name, tag, or author from the field at the top.
- Banks and Categories filter the list on the left; category color dots match the plugin's section hues.
- Tags stack with AND logic — click several to narrow the results.
- ★ Favourite any patch; double-click a row (or press Load Preset) to load it.
- Save, Save As…, and Delete manage your own patches; Init and Random sit at the bottom-left for quick starts.
Share sounds by exporting a .tilichupreset file (☰ menu → Export), or drop one into the user folder to import it.
19Preset Management
Beyond loading sounds, Tilichu gives you a complete workflow for saving, organizing, and sharing your own patches. Everything you create lives in the same browser as the factory content, tagged and searchable.
Saving a patch
Once you've built a sound, store it from the toolbar or the browser:
| Action | What it does |
|---|---|
| Save | Overwrites the current user patch in place. (Factory patches can't be overwritten — Save prompts for a new name instead.) |
| Save As… | Stores the sound under a new name, with fields for bank, category, author, and tags. |
| Delete | Removes the selected user patch. Factory patches are protected. |
Organizing: banks, categories & tags
Three layers keep a large library navigable, and you set all three when you save:
- Banks — the top-level container (e.g. Factory, User, or a named soundset). Use banks to keep a project's or a pack's sounds together.
- Categories — the sound type: Bass, Lead, Pad, Pluck, Keys, Arp, Soundscape, and so on. Each category carries a color dot that matches the plugin's section hues.
- Tags — free-form descriptors (Analog, Bright, Wide, Dark, Evolving…). A patch can carry many, and tags stack with AND logic in the browser to narrow a search fast.
Favourites & search
Star (★) the patches you reach for most and filter the browser to favourites only. The search field matches names, tags, and authors, and combines with the bank/category rail and the tag bar — so "user bank + Pad + Wide + favourited" is a couple of clicks away.
Import & export
Patches are portable as .tilichupreset files:
- Export — from the ☰ menu, export the current patch (or a whole bank) to a .tilichupreset file to back up or share.
- Import — choose Import preset… from the ☰ menu, or drop the file into the user presets folder (☰ → Open presets folder). It appears in the browser on next scan.
- Soundsets — third-party packs install as their own bank; nothing overwrites your existing work.
20MIDI, Automation & MPE
Tilichu responds to the full range of MIDI and host automation.
- MIDI Learn — right-click almost any control and choose MIDI Learn, then move a hardware knob to bind it.
- Host automation — every parameter is exposed to your DAW for automation lanes.
- Performance sources — velocity, aftertouch (channel and poly), mod wheel, and keytrack are all available as matrix sources.
- MPE — enable MPE in your host to route per-note pitch, pressure, and slide into the matrix for expressive controllers.
21Sound Design Walkthroughs
Three short recipes to connect the panels into finished sounds.
A. Evolving pad
- Start from Init. On OSC A pick a smooth wavetable and raise Unison to 5 with a little Detune and full Spread.
- Enable OSC B, detune it +7 semitones for a fifth, and lower its level slightly.
- Set ENV 1 to a slow attack and long release for a gentle swell.
- In the Matrix, route LFO 2 (slow, Smooth shape) to OSC A Pos with moderate depth — the timbre now drifts.
- Add Reverb (Hall) with a touch of Shimmer, and a slow Chorus before it.
B. Plucky bass
- Single oscillator, a bright saw-like table. Voice Mode MONO with a short Glide.
- ENV 1: fast attack, medium decay, zero sustain — the amp "plucks."
- Route ENV 2 to Filter Cutoff with positive depth; short decay gives the classic snap.
- Add Distortion (Tube) for harmonics, then a tight Compressor.
- Bring up the SUB an octave down for weight.
C. Granular texture
- Press Source, choose Granular, and load a vocal or field-recording sample.
- Lower grain Density for a sparse cloud; add Spray for randomness.
- Engage Freeze and route an LFO to the scan position for slow, hands-free movement.
- Filter with a gentle LP24, then Convolution (a large hall IR) and Widener to place it wide and deep.
22Troubleshooting & FAQ
No sound
Check that at least one source is enabled and routed to the Filter (or Direct), that ENV 1's level and the master aren't at zero, and that the track isn't muted in your host.
High CPU
Lower oversampling and voice count, set engine quality to Eco while writing, and freeze/bounce finished parts. Reverb and Convolution are the heaviest effects.
A patch sounds different than expected
Patches store their theme but not your global CPU settings. If a patch was made at higher oversampling, small timbral differences at lower settings are normal — raise Quality to match.
My edits vanished
Every change is undoable with Ctrl/Cmd + Z. If you loaded a new patch without saving, reopen the browser — your unsaved work is not stored, so Save often to the user bank.
Does Tilichu need a dongle? No — simple online activation, up to three machines.
Which formats? VST3, AU, and standalone (AU is macOS-only).
Can I import my own wavetables? Yes — Import WAV in the editor accepts single-cycle and full wavetable files.
Is it a subscription? No — $99 is a one-time purchase with no recurring fees.
23Keyboard & Mouse Reference
| Gesture | Action |
|---|---|
| Drag knob | Adjust value (vertical); faders and bars drag horizontally. |
| Shift + drag | Fine adjustment. |
| Double-click | Reset control to its default. |
| Right-click a control | MIDI Learn, assign modulation, or clear. |
| Drag ⠿ MOD pill → knob | Create a modulation route to that knob. |
| Cmd/Ctrl + Z | Undo · add Shift to redo. |
| Double-click preset row | Load that patch. |
| Drag rack slot | Reorder effects. |
| Esc | Close the browser or About dialog. |
Tilichu · Wavetable Synthesizer · © 2026 Butterlamp Audio